Management of projects and activities
Introduction
Project management is a major activity of any organization. Whether in agile or V-cycle mode, with a project or product approach, on strategic subjects involving management or on smaller subjects, the variety and multitude of projects require a flexible and effective system.
Activity management, although often less visible, is just as essential to ensuring that your IS runs smoothly. It concerns your recurring activities (outside Project mode): TMA, user support, PC and server management, etc. These activities mobilise a lot of financial and human resources, and also require a steering, Follow-up and communication system.

Abraxio allows you to manage this diversity with the level of methodology and detail suitable for each organisation and context.
Project or Activity Management
Create a project or an activity
Creating a project or an activity requires very few information and can be done in different places in the application:
- From the left-hand side of the Portfolios module :
- From the Projects Review and Activities Review, by clicking on + Create a Project or + Create an Activity :
During creation, the following popup appears :
- Select Project or Activity
The data to be filled in is :
- Name : name of the project or activity (mandatory)
- Rerence :
- This data is displayed if you have chosen to manage it.
- It can be automatically populated if you have chosen the automatic generation mode.
- See the Portfolios module configuration documentation for more details.
- Portfolio : select the portfolio to which you want to attach. The standard portfolio is proposed
- Manager : manager of the project
When you save, you are directed to the Definition page of the Project file:
Using the wizard, I can create my project or activity from a template. For more details on creating a project or activity from a template, a dedicated article is available here : Managing project and activity templates
Modify a Project or Activity
The initial data entered during creation of a Project or Activity can be accessed from the Identification section.
To modify them, you can :
- click on Edit in the Identification section
- click on the pencil over the name of the Project
You will find this initial information and others to complete the description of the project or activity.

The environment administrator can customize the analytical axes : Configuring Value Lists
Deleting a Project or Activity
You can delete a project or an activity from the advanced menu in the right-hand corner of the title bar :  :
:
A popup window will open to confirm the deletion:

You cannot delete a project or activity that has budget, Purchase orders or Consumption in its budget section.
Project life cycle
Projects and activities follow a 3-stage lifecycle :
- Qualifying stage : centralises the "Purchase order backlog", i.e. the projects to qualify, to arbitrate and to start.
- Started stage : groups together projects and activities in progress or recently finished.
- Finished stage : groups together abandoned requests and completed projects/activities that you no longer wish to see in the first instance.
These stages are divided into states to reflect the stage of progress and to define views suitable for specific work situations, such as the list of projects in progress, the list of projects to be arbitrated, etc.
These steps can be customized in the portfolio module settings: Configuring the Portfolios module
To change the stage and status of a project, click :
- on the status (link) in the title bar ("To qualify " in this example)
- on the pencil in the summary bar
The Progress popup then allows you to modify the stage and status, guiding you through the process :
For each status change, the user enters a date and can indicate a reason for the change if desired. The latest status change is highlighted visually on the screen with the date and author of the change.
All status changes are added to the project history, which can be viewed at any time:
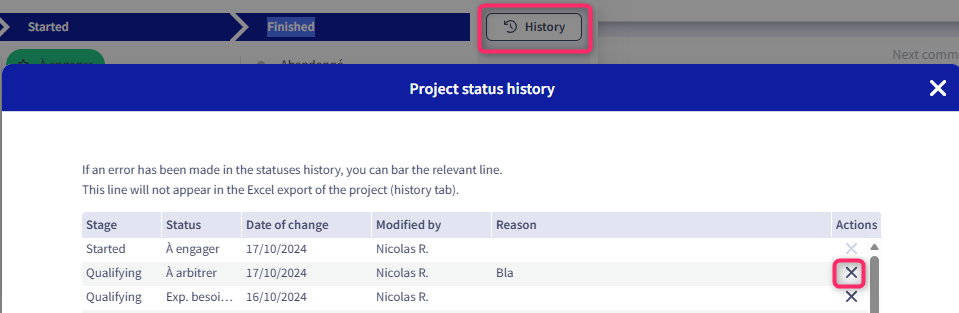
This history is displayed in a new tab in the Excel export of a single project and in the export of all projects and activities. If an error was made during a status change, the line can be canceled and will appear crossed out in the history. It will not appear in the Excel export.
When a project moves to the “Completed” stage, a pop-up window appears to inform the user of the actions to be taken to close the project “properly.” The user is prompted to create a dedicated task containing all of these actions.
Once a project has been moved to the Completed stage, it can be archived. It is then removed from the display lists but is still accessible from the project review tab.
Composition of a project or activity
The project and activity sheets are made up of different headings organised by theme. The use of each section will depend on the stage of progress, the nature (project or activity) and your management needs.
The sections are divided into 4 tabs :
- Definition : Identification of the project, team , requirements and value brought, Offered solution
- Management : operational management (planning, budget, risks, decisions, notes, tasks, documents)
- Follow-up : flash reports, decisions, notes and tasks
- Planning: detailed management of the Gantt schedule, staffing and budget Projects
Projects
As part of a global approach and/or on an ad hoc basis for strategic projects requiring advanced management, you can use all the sections:
New project request To qualify | Project qualification et arbitration Qualifying, To arbitrate | Projects to be managed In progress, Paused | |
| Identification | X | X | X |
| Requirements and value brought | X | ||
| Offered solution | X | ||
| Definition of initial budget | X | ||
| Planning | X | X | |
| Team | X | ||
| Budget & Workload | X | ||
| Risks | X | X | |
Decisions | X | X | X |
Notes | X | X | X |
| Flash Reports | X | ||
| Tasks | X | X | X |
| Documents | X | X | X |
To simplify your approach and/or for less sensitive projects, you can reduce your level of use to the following sections :
New project request To qualify | Projects to be managed In progress, Paused | |
| Identification | X | X |
| Planning | X | |
| Budget & Workload | X | |
| Flash Reports | X |
Activities
For activities, certain sections and phases are less relevant :
- The following sections are therefore not presented : Requirements and value brought, Proposed solution, Planning.
- The qualification stage remains available but will certainly be less used.
A typical use would be as follows:
| Activities in progress | |
| Identification | X |
| Team | X |
| Budget & Workload | X |
| Risks | X |
Decisions | X |
Notes | X |
| Flash Reports | X |
| Tasks | X |
| Documents | X |
Export project and activity data
Exports can be accessed from the project or activity concerned, from the advanced menu in the form at the top right of the title bar :
Three exports are available :
- Single export of a project or activity from the Portfolio module
This export contains all the data relating to a project or activity:
- data from published Flash reports
- data relating to the project schedule: batches, phases, activities and milestones,
- identified risks,
- all the budget data if the user is responsible for the project or activity budget.
- Export timesheets
This export contains all the data relating to time entered on the project via timesheets.
- Power Point export of the latest flash report
This export allows you to export the latest flash report published on the project in Power Point format.
The export has been carefully designed to allow you to edit and customise all areas of the flash report, making the task easier by providing you with a library of Powerpoint components.

All flash reports can be exported in Power Point format:
- From the Flash report viewer > Click on the
- From the Portfolio module > Select your project > Tracking tab: on the Flash report click on Export Power
Related Articles
Portfolio management
Preamble The concept of portfolios allows you to organize your many projects and activities to facilitate access and management. You can work with a single portfolio or create several. Generally, a portfolio groups together projects and/or activities ...User Management
Access to user management You can access user management from the Administration menu on the left-hand side of the screen . Select the “Users” submenu Access to these features requires Administrator permissions. Principles and life cycle A user is a ...Gantt project planning
Introduction On a Project sheet, you can define a schedule. In its minimal form, the schedule will only contain a start and end date for the Project. In an advanced form, if required, it will contain a detailed schedule with Lots, Phases, Activities ...Create and manage your Projects / Activities risks
Preamble As a project manager, it is essential that risk management is at the heart of your concerns. Project risk management aims to identify, evaluate, arbitrate and monitor these risks, on the dimensions that interest you (operational, strategic, ...Configuration of the Management module
Assignments Section These settings allow you to customize the information displayed on the assignment tables in the detail block of an employee in the Teams module, on the Assignments tab. Based on this configuration, additional columns are added to ...